Zoom Integration with Slayte
Slayte offers two ways to connect Zoom to your event sessions. You can attach any existing Zoom meeting by pasting its join link, meeting ID, and passcode; or you can use Slayte’s native Zoom integration to provision and manage meetings more seamlessly. With the native integration, designated users can join as Zoom hosts based on their email, even if they are not directly assigned a Zoom license on your account. This reduces staff workload and lets speakers start and manage their own sessions.
Add Slayte to Your Zoom Account
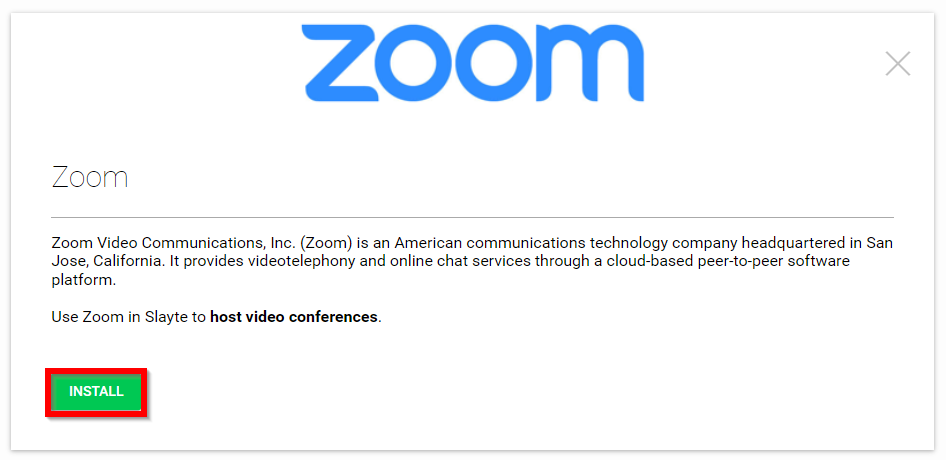
Install the Slayte app from within Slayte’s Marketplace area to link your Zoom account. This enables secure authorization and prepares your account for creating and attaching Zoom meetings to sessions.
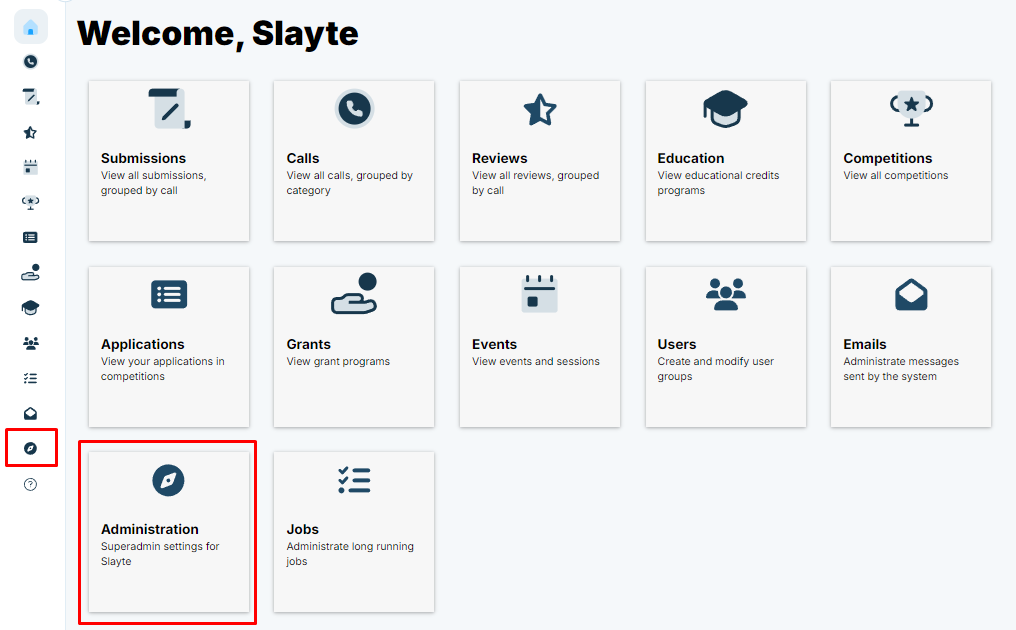
- From the Home screen in Slayte, select the Administration tile or the Administration icon from the left panel.
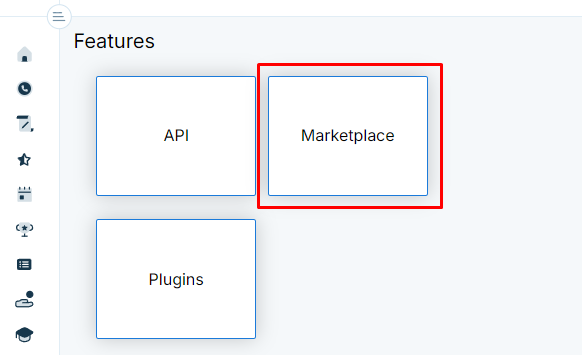
- Navigate to the Features category and select Marketplace.
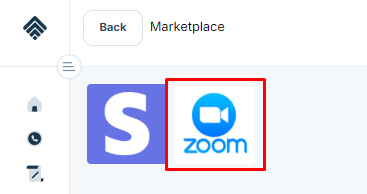
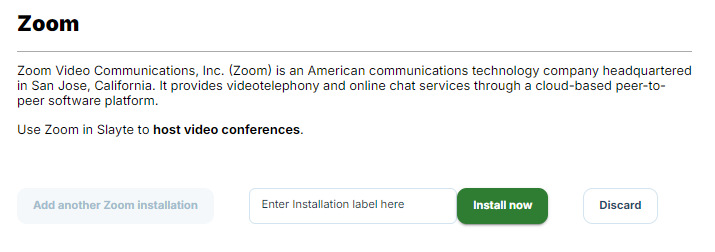
- Select Zoom.
- Select Install.
- Enter an Installation Label (choose a name that is easy to identify), then select Install Now.
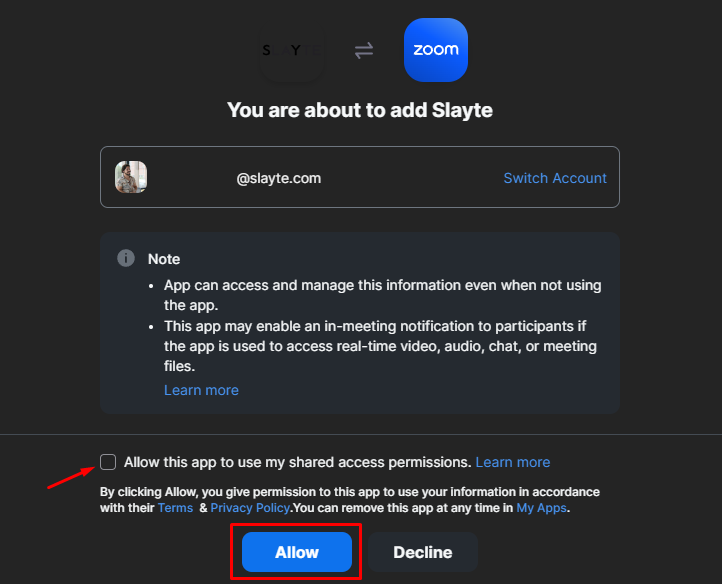
- You will be redirected to your Zoom account. Select Allow this app to use my shared access permissions and then click Authorize.
Connect Zoom API Credentials
After saving the configuration, you must create an app in Zoom and paste its credentials into Slayte to complete the setup.
- Visit the Zoom App Marketplace at https://marketplace.zoom.us/develop/create.
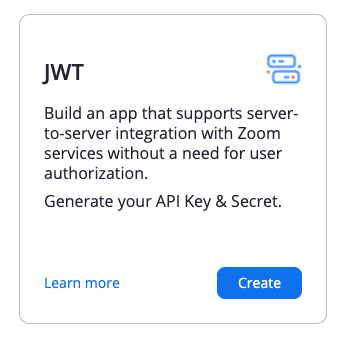
- Click Create in the JWT app (or Server-to-Server OAuth if JWT is not available).
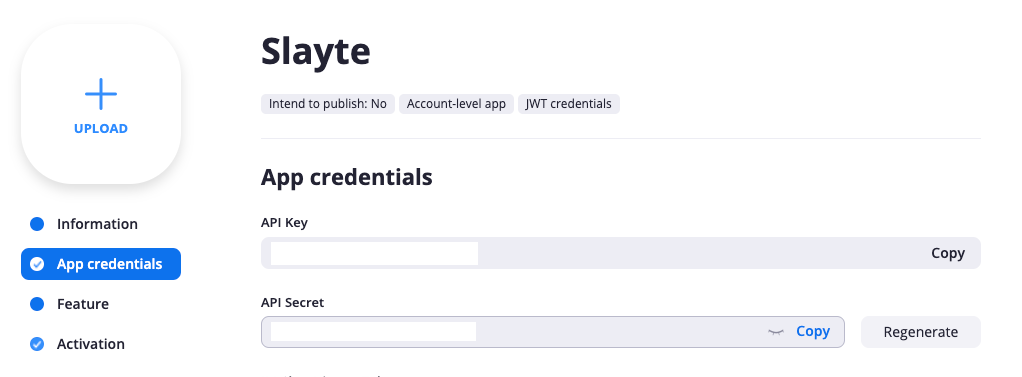
- Enter Slayte as the app name, and complete the setup steps.
- Go to App Credentials and copy the API Key and API Secret.
- Back in Slayte, under Administration > Marketplace > Zoom, select the installation label you created earlier and click Configure.
- Paste the API Key and API Secret, then click Save.
Now your Zoom account is fully configured with Slayte. You can use all the benefits of the integration, including assigning speakers as hosts without requiring staff intervention.
Using Zoom with Slayte
Once the integration is complete, you can:
- Use your Zoom license when creating a session in Slayte.
- Designate users as Zoom hosts so they can manage their own meetings.
- Assign Zoom licenses to users by entering their email addresses during session setup.
For a detailed walkthrough, see: Assign Your Speaker as Zoom Host
Prerequisites
- An active Zoom account with a valid license.
- Properly created Zoom app credentials (API Key and Secret).
- Users designated as hosts should be entered with the same email address they use in Zoom.
Removing Zoom from Slayte
If you no longer want to use Zoom with Slayte, uninstall the app from your Zoom account:
Log in to your Zoom account and navigate to the Zoom App Marketplace.
Click Manage in the top-right corner.

Go to Added Apps and locate the Slayte app.
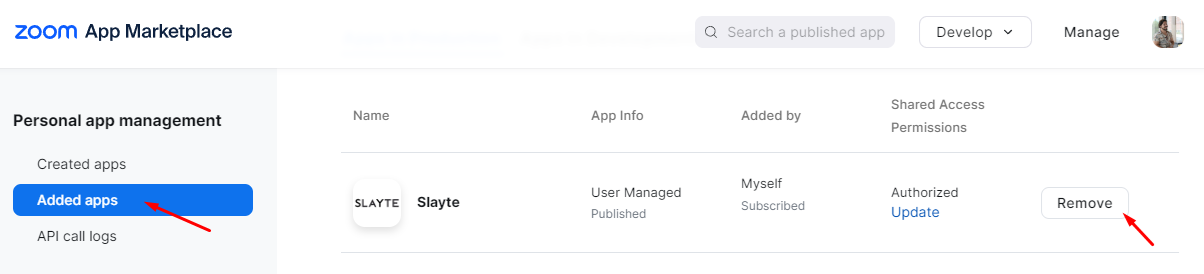
Provide feedback if requested to complete the uninstall process.
Removing the integration will:
- Disable any future sessions scheduled with Zoom via Slayte.
- Revoke Zoom host permissions within Slayte.
- Delete stored Zoom credentials, preventing new sessions until the integration is reconfigured.
Troubleshooting
Cannot add the Slayte app to Zoom: Ensure your Zoom account is properly licensed and that the app is available in your region.
Zoom sessions are not syncing with Slayte: Verify that your API Key and API Secret are entered correctly in Slayte.
Unable to remove Zoom from Slayte: Make sure no active sessions are using Zoom before attempting to remove the integration.
FAQ
-
Can I use multiple Zoom licenses with Slayte?
Yes, you can assign different Zoom licenses to various sessions or users as needed. -
How do I designate users as hosts in Zoom?
In the session setup within Slayte, enter the email addresses of the users you want to assign as hosts. These users will automatically join as Zoom hosts. For a step-by-step guide, see: Assign Your Speaker as Zoom Host.
Support
For additional help, contact our team via the Slayte Support Portal.
Related Articles
Assign Your Speaker as Zoom Host
Slayte is a Zoom partner and offers one of the most comprehensive Zoom integrations available. With this integration, you can assign session speakers as Zoom hosts without requiring them to be added to your organization’s Zoom license. This makes it ...Event Integration
You are able to connect your Slayte event with your Impexium Event. Go to Events, and click the desired even tile To the left, under the Settings section; click Integrations Click Add Integration Select Type of integration(example: Impexium Events) ...Zoom
Zoom has become indispensable as remote work and virtual communication increasingly become the norm. Offering a leading conference software experience, Zoom excels in virtual meetings, events, and webinars. Key Benefits Ease of Use – Zoom’s intuitive ...Webhook Integration with Slayte-Impexium for Events
Slayte integrates with Impexium through webhooks to automate event-related actions between both systems. By configuring webhooks in Impexium, specific actions such as registrations, product purchases, cancellations, or substitutions are automatically ...Add a Virtual Component to a Session
Adding a virtual component to your sessions makes them more accessible, flexible, and engaging for attendees. Whether participants join from home, the office, or across the globe, virtual options ensure your event can reach as many people as ...