Embedding Slayte Call Forms in Impexium Sites
Slayte has the ability to integrate itself with Impexium and be embed in Impexium Sites, there’s configuration from both ends involved but very straight forward.
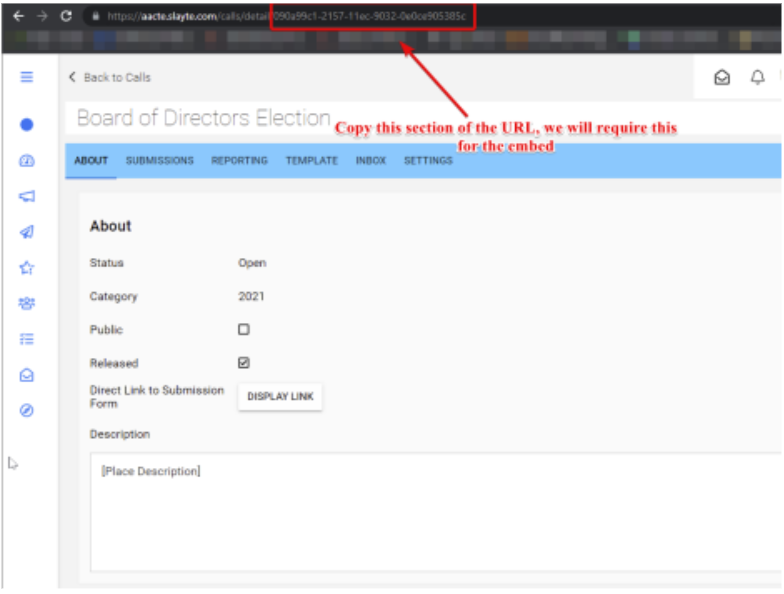
First, we need to identify the call form we wish to embed and extract the Call UID. To do this, simply open the desired call and look at the URL:

Next, let’s create the Slayte embed for this specific call to be setup in an Impexium page.
- Let’s head over to Administration icon
 on the left-hand navigation bar.
 - Click under Design and then Embedding.
- Click on

- Under Label, let’s give it a name that it’s easy for you to identify.
- Under Type, select the type of embedding that suits your needs: a. Call Detail: This embeds the landing page of the specific call, where the users can see the landing page of the call, including the description of it. b. Submission Form: This embeds the actual form itself directly into the site, so it’s immediately visible to the users. c. Submission Library: This shows a repository of all the submissions that have been approved in Slayte, this is more akin, for staff internal review.
- Select if Active or Inactive, if Inactive a placeholder will be rendered until the call is active. Choose Active for this case.
- Enter the Call UUID previously gathered from the call in this field.
- Under Plugins choose Impexium.
- Under Login Automatically, you can choose if Slayte will automatically log in with the existing Slayte session.
- Prevent users from leaving the site can be enabled if you want to prevent the users for navigating outside of the embed, this is primarily useful when embedding a specific call form in a page
- Click
 to commit the changes.
At the bottom section, you will notice an Embed Code, which contains the code we will be using in Impexium.
With the Slayte embed configured, we just need to embed the previously obtained code in Impexium Web Sites. Follow these steps:
- Login to the Impexium Administration Console.
- On the left-hand navigation bar, click on

- Choose the Main site and click

- Create a new website page by clicking the
 button.
 - Under the newly created page, click under Page Content tab.
- Choose the location of where the content will be displayed and click the

button to add a content item in the page.
7. Under Content type search for Submissions and click  at the bottom
8. Click the
  button and under HTML Content Settings section, click the switch button to change to
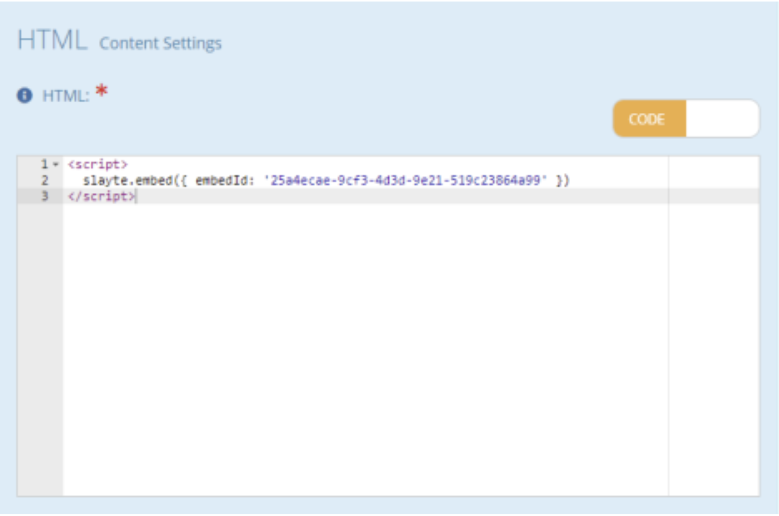
  9. Lastly, under the box presented, paste the code previously obtained from the Slayte Embed Configuration and Paste it in the Code Box.

- Click the
 button to commit the changes.
Your Impexium website with Slayte Embed is now ready.
Related Articles
Impexium
Impexium integration streamlines conference management by connecting registration, attendees, agendas, speakers, and sponsors into a single, unified platform. By integrating with Impexium, Slayte reduces manual data entry and eliminates duplication; ...Webhook Integration with Slayte-Impexium for Events
Slayte integrates with Impexium through webhooks to automate event-related actions between both systems. By configuring webhooks in Impexium, specific actions such as registrations, product purchases, cancellations, or substitutions are automatically ...Submission Form - Additional Forms
Use the Additional Form field type when you need someone other than the submitter, such as a reference, recommender, or outside reviewer, to fill in a separate form. The submitter will be prompted to enter the recipient's email address, and the ...Slayte common definitions (Glossary)
Administrator Administrators can create calls, events, competitions, grants, outreach, and education programs within the Slayte platform. They also manage users, assign roles and permissions, and configure system settings. Blind Review Enables ...Embedding Session Schedule and Speakers with Unique Direct Links
Introduction This guide will outline the process in detail for embedding a Session Schedule or Speaker listing for a specific event. This allows individuals to also capture specific sessions of interest or speaker profiles and share links that will ...