Create Custom PDF Templates for Submissions Export
As an administrator, one can specify, under the submission phase, a custom template to use and generate PDF exports of individual submissions.
This is particularly useful when only specific information is needed to be included besides the default template or apply customized branding. The custom templates are built in HTML/CSS. Follow these steps to proceed:
-
Go to Calls, and select the desired call
-
Click Template from the top bar
-
Next to the submission phase to update, click Edit
-
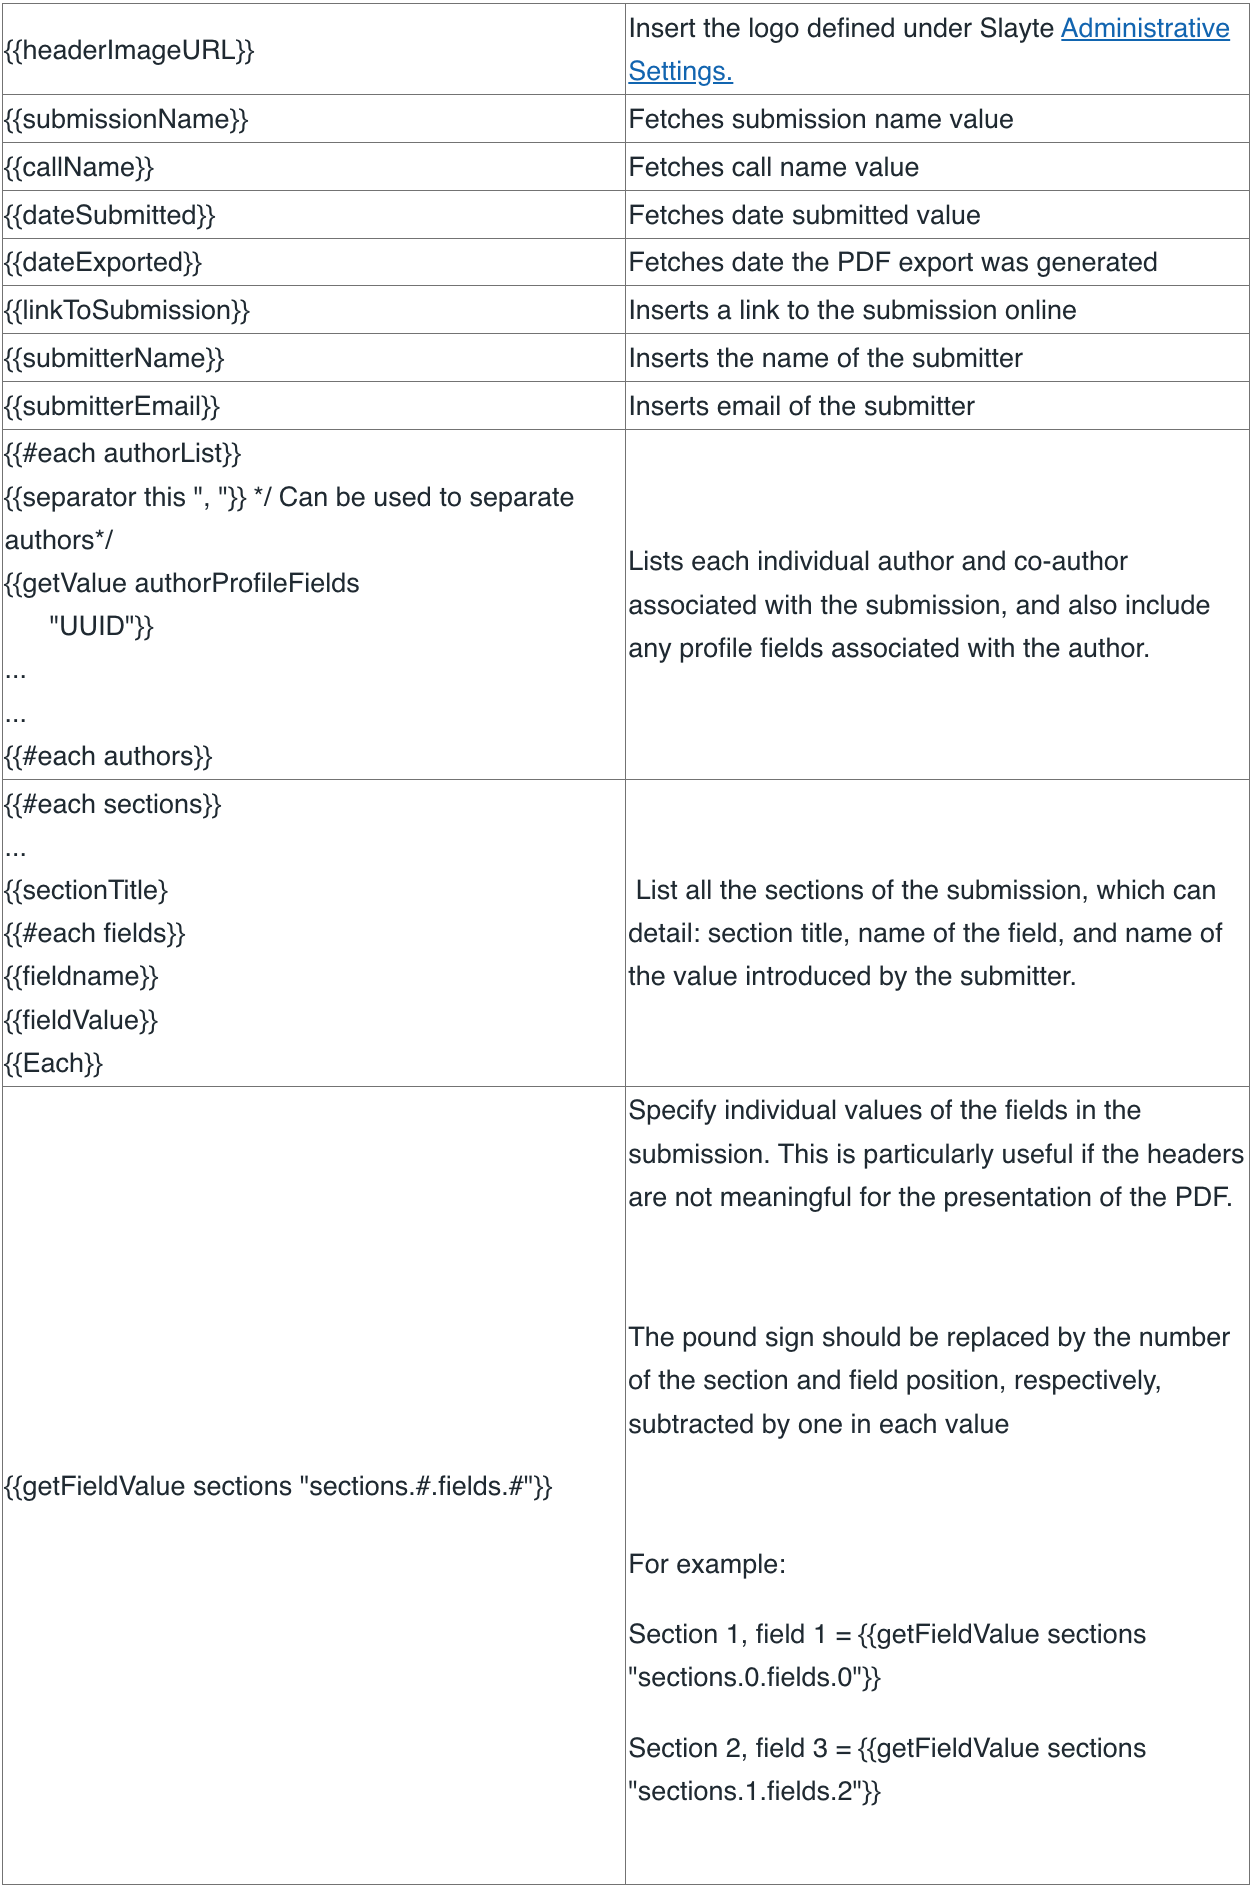
Scroll down to the PDF Settings section, and click **Upload Template.**Find below some template placeholders and a default PDF sample.
Template Placeholders

Sample Default PDF
<!DOCTYPE html>
<head>
<style>
html {
font-size: 10pt;
font-family: Arial;
}
.row {
display: flex;
flex-direction: row;
flex-wrap: wrap;
width: 100%;
}
.column {
display: flex;
flex-direction: column;
flex-basis: 100%;
flex: 1;
}
.field-values {
}
.field-value, .field-value-small {
display: flex;
margin-bottom: 0.25rem;
align-items: center;
justify-content: center;
}
.field-value-small {
font-size: 7pt;
}
.field-value .name, .field-value-small .name {
font-weight: bold;
margin-right: 1rem;
text-align: right;
flex-shrink: 0;
flex-grow: 0;
}
.field-value .name {
width: 12rem;
}
.field-value-small .name {
width: 5rem;
}
.img-head {
max-height: 10vh;
}
.header {
align-items: center;
margin-bottom: 2vh;
}
.header-info {
margin-top: 15px;
font-size: 7pt;
}
.img-head img {
width: 100%;
height: 100%;
object-fit: contain;
overflow: hidden;
}
.separator {
margin-bottom: 10px;
margin-top: 10px;
font-size: 8pt;
display: flex;
color: rgb(200, 200, 200);
width: 85%;
margin-left: auto;
margin-right: auto;
align-content: center;
align-items: center;
justify-content: center;
}
.separator span {
flex-grow: 1;
text-align: center;
}
.separator hr {
flex-grow: 4;
flex-shrink: 0;
background-image: linear-gradient(to right, rgba(200, 200, 200, 0), rgba(200, 200, 200, 0.75), rgba(200, 200, 200, 0));
}
hr {
border: 0;
height: 1px;
background-image: linear-gradient(to right, rgba(0, 0, 0, 0), rgba(0, 0, 0, 0.75), rgba(0, 0, 0, 0));
}
</style>
</head>
<body>
<div class="header">
<div class="row">
<div class="column img-head" style="flex-grow:1">
<img src="{{headerImageUrl}}" />
</div>`
<div class="column" style="flex-grow:2; text-align: center;">
<h2>{{submissionName}}</h2>
<h3>{{callName}}</h3>
</div>
<div class="column" style="flex-grow:1">
<div class="header-info">
<div class="field-value-small">
<div class="name">Submitted:</div>
<div class="value">{{dateSubmitted}}</div>
</div>
<div class="field-value-small">
<div class="name">Exported:</div>
<div class="value">{{dateExported}}</div>
</div>
<center>powered by <a href="https://www.slayte.com" target="_blank">www.slayte.com</a></center>
</div>
</div>
</div>
</div>
<div class="row">
<div class="field-value-small">
<div class="name">Link to submission:</div>
<div class="value" style="font-size: 5pt">
<a href="{{linkToSubmission}}" target="_blank">{{linkToSubmission}}</a>
</div>
</div>
</div>
<h3>AUTHOR INFORMATION</h3>
<div class="row">
<div class="column">
<div class="field-value">
<div class="name">Submitter</div>
<div class="value">{{submitterName}} ({{submitterEmail}})</div>
</div>
</div>
<div class="column">
<div class="field-value">
<div class="name">Authors</div>
<div class="value">{{#each authorList}}{{separator this ", "}}{{/each}}</div>
</div>
</div>
</div>
<h3>Authors List</h3>
<div class="row">
<ul>
{{#each authors}}
<li>{{authorName}} ({{getValue authorProfileFields "01bfb579-afb3-4db8-8b38-c3f49d530788"}}, {{getValue authorProfileFields "252fc821-a0a8-4cfc-8029-a75f96afc2ee"}}) </li>
{{/each}}
</ul>
<hr />
</div>
<h2>Sections & Fields</h2>
<div class="row">
{{#each sections}}
Section {{sectionTitle}}<br />
Fields:<br />
{{#each fields}}
{{fieldName}}: {{fieldValue}}<br />
{{/each}}
{{/each}}
</div>
<div>
{{getFieldValue sections "sections.0.fields.2"}}
</div>
</body>
</html>
- Once the template has been created/selected, you can View Preview and define the allowed PDF attachments fields to be exported with the submissions

NOTE:
If you would like us to design a custom template for you, you can request a quote, email us to hello@slayte.com.
Related Articles
Create Custom Fields
Custom fields let you capture event-specific details for sessions; use them to store information that is not covered by the default fields (for example, Track, Session Code, Room Setup, or AV Notes). Administrators create one or more custom field ...Email Templates
Email Templates allow you to customize the content of notifications sent by the platform. These can include confirmation messages for submitters or assignment notices for reviewers. Auto-generated Emails Certain triggers in the platform can be ...Submissions Tab Functions
The Submissions tab displays all submitted and draft submissions. As an Administrator, you have several options to gather, export, manage, and view submission data. These options are available via the ellipsis button at the top-right corner: Export ...Export/Link submissions to an Event from a Call
All the data gather via submissions on a Call, can be exported/linked to your event to be easily used to create sessions or sub-sessions. From the desired call, click the Submission tab from the top bar Click the ellipsis button on the right top ...Export Submission(s)
Navigate to the desired call Select the Submissions tab menu option Select the ellipses on the top right Click Export Select the export formatyou prefer (CSV or PDF) When selecting CSV, choose whether you would like to export the Submissions visible ...