Configure a Credit Provider
Credit Providers are the institutions responsible for issuing credits to claimers. Claimers may have the option to choose which credit they wish to earn.
Configuring a Credit Provider
- From Home, select Education.
- Navigate to the Providers tab.
- Click Create Provider.
Provider Configuration Options
- Name: This should match the Credit Provider’s name in YOUR AMS. It must match exactly to avoid discrepancies.
- Credit Name: This is the name of the credit assigned to the provider within Slayte for display purposes.
- Certificate Template: Slayte generates a PDF certificate when claims are submitted. You can upload a custom HTML certificate template (.hbs or .handlebars format, UTF-8 encoded).
- Profile Fields: These are administrator-defined fields that users must fill before submitting credit claims.
- Field Name: Label displayed to users (e.g., License Number).
- Placeholder Name: The variable name used in the certificate template.
- Requirement: Determines if the field is mandatory before generating the certificate.
- Click Save to apply the configuration.
Certificate Template Placeholders
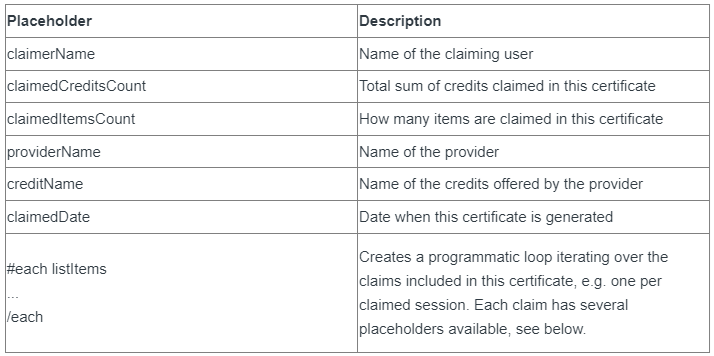
Claim Certificate Placeholders

Creating Custom Profile Field Placeholders
To configure non-system placeholders, administrators can map custom profile fields into the provider’s profile. Click here to learn how claimers populate these fields before generating certificates.
Steps to Add Custom Profile Fields
- Under Education, go to the Providers tab.
- Select + Create New Provider or click Edit to modify an existing provider.
- Click + Add Profile Field and configure:
- Field Name: The label displayed to users completing the provider profile.
- Placeholder Name: The value used as a placeholder in the certificate template. Must be in camelCase.
Certificate Example
Below is an example of a generated certificate and its corresponding template.

Certificate Template Source Code
<!DOCTYPE html> <html lang="en"> <head> <meta charset="UTF-8"> <meta name="viewport" content="width=device-width, initial-scale=1.0"> <meta http-equiv="X-UA-Compatible" content="ie=edge"> <title>Certificate</title> </head> <body style="text-align: center; margin-top: 15px"> <img width="200px" src="https://upload.wikimedia.org/wikipedia/commons/2/2d/600px/_Black/_star/_White/_background.svg"/> <h1>Certificate of Continuing Education</h1> <div> <p>{{claimerName}}</p> <p style="width: 800px; margin: 0 auto;"> has completed {{claimedCreditsCount}} clock hour(s) of continuing education at <strong>{{providerName}}</strong> </p> <p>(License Number {{licenseNumber}}).</p> </div> <p><br /></p> <ol style="width: 800px; margin: 0 auto;"> {{#each listItems}} <li> {{claimItemName}} ({{claimItemCreditAmount}} "{{creditName}}" credits, claimed on {{claimItemDate}}) </li> {{/each}} </ol> <br/> <br/> <div> <p style="text-decoration: underline">Jennifer Ng</p> <p>President & CEO</p> <p>American Society on Industrial Mechanics</p> </div> </body> </html>
Related Articles
Configure the Certification
In this section, you can configure how certifications will be granted in your Education Program. 1. Specify the Submit Behavior Choose how claims should be submitted: User has to confirm submission of all claims: The user must manually submit all ...Delete Credit Provider
Deleting a Credit Provider Follow these steps to delete a Credit Provider from the system: Go to Education and navigate to the Providers tab. Click Edit next to the provider you want to delete. Click Delete to remove the provider. Important Notes ⚠️ ...Configure Access Control
Go to the Education Credits Program and click View. Navigate to the Settings tab. Click the Edit button at the bottom of the page. Adjust the settings to define how attendees can claim credits. Access Configuration Options Claimable From/Until: Set ...Configure Attendance of Sessions
Attendance tracking can be configured so that participants must remain in a session for a set amount of time before they are marked as attended. This feature is especially useful when the event is awarding education credits and needs to ensure that ...Claim Credit(s) After Attending In-Person Session
After attending an event where your session attendance was recorded, you can claim credits for those sessions by following these steps: Visit the claim program using the link provided by the organizer. After logging in, you will see a page like this: ...